Category Landing Page is a special type of Category Page. In Magento, Merchants are able to set special content for a specific category. Check how to implement this cool feature in PWA Studio.
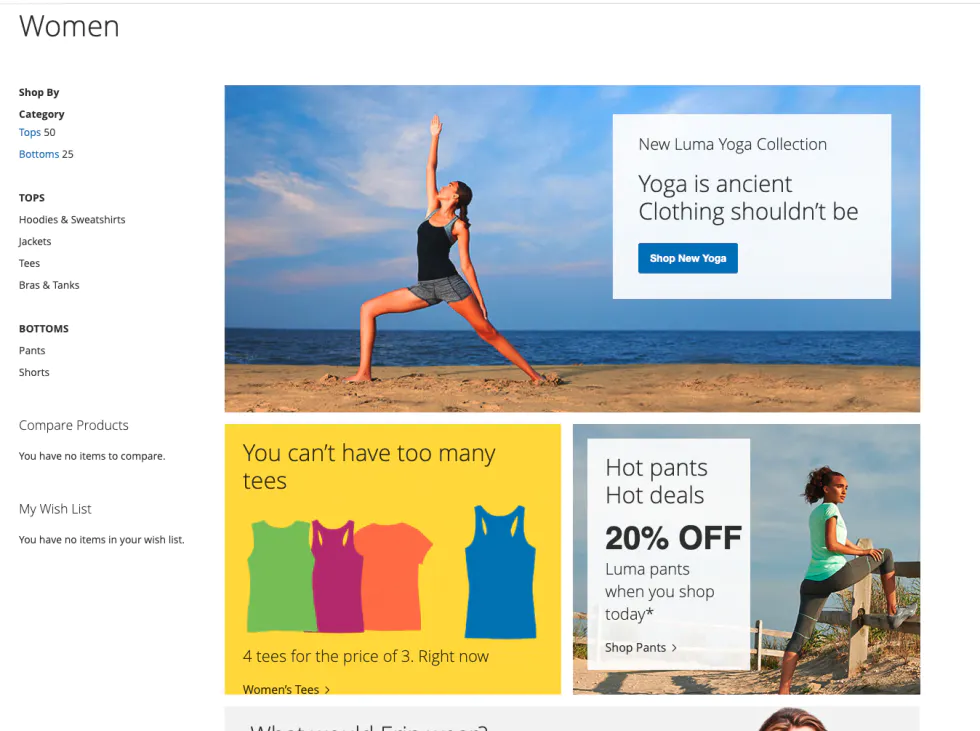
A Category Landing Page is a special type of Category Page. In Magento, a Merchant can set unique content for a specific category. Take a look at this sample Magento Luma Category Landing Page:

How does it work
In the Magento category page configuration, there is a config field called Display Mode and there are three available options:
-
Products only
-
Static block only
-
Static block and products

If you select the ‘Static block only’ option and set up a static block for the category, you will see your static block on the frontend for the Category, and this is precisely what the Category Landing Page means.
Does PWA Studio support Category Landing Pages?

No.
No.
No.
Is it possible to add support for CLP in PWA Studio?
If you read my blog….
Definitely YES.

Let’s do this!
Install PWA Studio
The very first thing that we need to do is create a new instance of PWA Studio.
$ yarn create @magento/pwa$ cd <directory where PWA Studio has been installed$ yarn buildpack create-custom-origin ./Also, we need to have our own Magento 2 instance. This time I am using Magento 2.4.2 with sample data installed. If you don’t have your own local Magento 2 installation, I recommend using Mark Shust’s Magento Docker.
People often ask me:
What is the best way to install Magento in the local environment?
Then I tell them:
Use Mark’s Docker – it’s the best

The Idea
To achieve our goal, we are going to use the PWA Studio Extensibility framework. We will create an improvedCategoryContent component which will be a wrapper for CategoryContent PWA Studio’s component. We will add additional logic there and display Category Landing page content instead of an empty page.
Implementation
Create theme
Before we start coding, let’s create a directory to keep all modifications related to the Category Landing Page.
First, create @theme/category folder in pwa_studio_root/src directory.
Second, let’s link this folder as a package in the package.json
dependencies": { "@magento/pwa-buildpack": "~9.0.0", "@theme": "link:src/@theme"},Add improvedCategoryContent component
Create file src / @theme / category / components / ImprovedCategoryContent / ImprovedCategoryContent.js with the following content:
import React from "react";import PropTypes from "prop-types";
import CategoryContent from "@magento/venia-ui/lib/RootComponents/Category/categoryContent";import LoadingIndicator from "@magento/venia-ui/lib/components/LoadingIndicator/indicator";import { useImprovedCategoryContent } from "../../talons/useImprovedCategoryContent";import CategoryLandingPage from "../CategoryLandingPage";
/** * The ImprovedCategoryContent wraps CategoryContent @components and allows to display Category Landing Pages * @param {object} props * @param {number} props.categoryId - Category's ID * @param {object} props.classes - additional CSS classes that will be applied to the component * @param {object} props.data - Category data * @param {object} props.pageControl - Pagination data * @param {number} props.pageSize - Page size * @param {object} props.sortProps - Sort props */const ImprovedCategoryContent = (props) => {  const {    categoryId,    classes,    data,    pageControl,    sortProps,    pageSize,    ...rest  } = props;
  const { isLandingPage, isLoading, staticBlockId } =    useImprovedCategoryContent({ categoryId });
  const categoryContent = isLandingPage ? (    <div>      <CategoryLandingPage staticBlockId={staticBlockId} />    </div>  ) : (    <CategoryContent      categoryId={categoryId}      classes={classes}      data={data}      pageControl={pageControl}      sortProps={sortProps}      pageSize={pageSize}    />  );
  const shouldDisplayContent = !isLoading ? (    categoryContent  ) : (    <LoadingIndicator />  );
  return <div {...rest}>{shouldDisplayContent}</div>;};
ImprovedCategoryContent.propTypes = {  categoryId: PropTypes.number.isRequired,  classes: PropTypes.object,  data: PropTypes.object,  pageControl: PropTypes.object,  pageSize: PropTypes.number,  sortProps: PropTypes.array,};
export default ImprovedCategoryContent;
The purpose of this component is to check if the category page is a category landing page. All logic related to checking that is in useImprovedCategoryContent hook that we will create in the next step.
If the category is a landing page, the CategoryLandingPage component is rendered. Otherwise, native PWA Studio’s CategoryContent will be rendered.
Next, create the src / @theme / category / components / ImprovedCategoryContent / index.js file with following content:
export { default } from "./ImprovedCategoryContent";Add GET_CATEGORY_LANDING_PAGE query Before implementing the hook, let’s create a GraphQL query that will get information about category display mode and a Static Block ID used for a category’s content.
Create a src/@theme/category/queries.gql.js file:
import gql from "graphql-tag";
export const GET_CATEGORY_LANDING_PAGE = gql`  query category($id: Int!) {    category(id: $id) {      id      display_mode      landing_page    }  }`;
The query is really straightforward. One important thing here is the ID field in results. Thanks to that ID, Apollo Client can merge these query results with other queries by ID.
Records are merged by ID, and if you have three queries for a category with the same ID, results will be stored in Apollo cache and available without querying to the server. How powerful is that?
Add useImprovedCategoryContent hook
Create a src / @theme / category / talons / useImprovedCategoryContent.js file:
import { useQuery } from "@apollo/client";import { GET_CATEGORY_LANDING_PAGE } from "../queries.gql";
/** * Returns props necessary to render the ImprovedCategoryContent @component. * * @param {object} props * @param {number} props.categoryID * * @returns {string} result.error - error message returns if something went wrong * @returns {bool} result.isLandingPage - flag determinates is a Category is in Statick Blocks only mode. *                                        This is true when display mode eauals 'PAGE' * @returns {bool} result.isLoading - flag determinates is data loading * @returns {number|null} result.staticBlockId - Static block ID set up for the Category Page or null. */export const useImprovedCategoryContent = (props) => {  const { categoryId } = props;
  const { data, loading } = useQuery(GET_CATEGORY_LANDING_PAGE, {    fetchPolicy: "cache-and-network",    nextFetchPolicy: "cache-first",    variables: {      id: categoryId,    },  });
  return {    isLandingPage: data && data.category.display_mode === "PAGE",    isLoading: loading,    staticBlockId: data ? data.category.landing_page : null,  };};
Note: Because I want to keep this example simple, I do not handle errors here. If you would to take a look at how error handling can be done, check this article, please.
That hook receives one parameter - categoryId, and it gets data from the Magento backend using the already declared GET_CATEGORY_LANDING_PAGE query.
Hook returns three fields:
-
isLandingPage - this flag determines category is a landing page or not. Each category that has set up Display Mode equals Page is a landing page.
-
isLoading - determines state of data loading
-
staticBlockId - ID of static block set up for Category landing page.
Update local-intercept.js
It’s time to inject our component into Storefront. Take a look at the code below. If you are not familiar with PWA Studio extensibility framework, check this article.
File src/local-intercept.js:
const { Targetables } = require("@magento/pwa-buildpack");
module.exports = (targets) => {  const targetables = Targetables.using(targets);
  const CategoryRootComponent = targetables.reactComponent(    "@magento/venia-ui/lib/RootComponents/Category/category",  );
  const ImprovedCategoryContent = CategoryRootComponent.addImport(    "ImprovedCategoryContent from '@theme/category/components/ImprovedCategoryContent'",  );
  CategoryRootComponent.replaceJSX(    "<CategoryContent />",    `<${ImprovedCategoryContent} />`,  ).setJSXProps(`ImprovedCategoryContent`, {    categoryId: "{id}",    classes: "{classes}",    data: "{categoryData}",    pageControl: "{pageControl}",    sortProps: "{sortProps}",    pageSize: "{pageSize}",  });};
To insert the ImprovedCategoryContent component, we added import to the Category root component. We used the replaceJSX method to insert the component to the JSX (replace the native component with our new one). We passed all props from the native component to ours.
Add CategoryLandingPage component
First, create a file src / @theme / category / components / CategoryLandingPage / CategoryLandingPage.js with the following content:
import React from "react";import PropTypes from "prop-types";import PlainHtmlRenderer from "@magento/venia-ui/lib/components/RichContent";import LoadingIndicator from "@magento/venia-ui/lib/components/LoadingIndicator/indicator";
import { useCategoryLandingPage } from "../../talons/useCategoryLandingPage";import classes from "./CategoryLandingPage.module.css";
/** * The CategoryLandingPage @component displays CMS content for categories that have set up Display mode to Static block only. * * @param {object} props * @param {string} props.staticBlockId - Static block's ID that provides content for the Page */const CategoryLandingPage = (props) => {  const { staticBlockId, ...rest } = props;
  const { content, errorMessage, isLoading } = useCategoryLandingPage({    staticBlockId,  });
  const shouldDisplayContent = !isLoading ? (    <PlainHtmlRenderer html={content} />  ) : (    <LoadingIndicator />  );  const shouldDisplayError = errorMessage ? <p>{errorMessage}</p> : null;
  return (    <div className={classes.categoryLandingPage} {...rest}>      {shouldDisplayContent}      {shouldDisplayError}    </div>  );};
CategoryLandingPage.propTypes = {  staticBlockId: PropTypes.string.isRequired,};
export default CategoryLandingPage;
Keep in mind the component is rendered if a category has display mode equals Page set up. The component receives staticBlockId prop and uses it to get content for a specific category.
Content is rendered using PlainHtmlRenderer. If something went wrong, an error message is rendered.
Second, create a file src / @theme / category / components / CategoryLandingPage / index.js:
export { default } from './CategoryLandingPage';Lastly, create a CSS module src /@theme / category / components / CategoryLandingPage / CategoryLandingPage.module.css
.categoryLandingPage { padding: 20px;}Add useCategoryLandingPage hook
The last thing needed to display the Category landing page’s content is the hook that collects content from Magento.
Create a file src / @theme / category / talons / useCategoryLandingPage.js:
import { useState, useEffect } from 'react';import { useQuery } from '@apollo/client';import { GET_CMS_BLOCKS } from '@magento/venia-ui/lib/components/CmsBlock/cmsBlock.js';
/** * Returns props necessary to render the CategoryLandingPage @component. * * @param {object} props * @param {number} props.staticBlockId - ID of a Static Block connected with the Category Landing Page * * @returns {string} result.errorMessage - error message returns if something went wrong * @returns {bool} result.isLoading - flag determinates is data loading * @returns {string} result.content - HTML content of Static Block connected to the Category Landing Page */export const useCategoryLandingPage = props => {    const {        staticBlockId    } = props;
    const [ content, setContent ] = useState(null);    const [ errorMessage, setErrorMessage ] = useState(null);
    const { data, error, loading } = useQuery(GET_CMS_BLOCKS, {        fetchPolicy: 'cache-and-network',        nextFetchPolicy: 'cache-first',        skip: !staticBlockId,        variables: {            identifiers: [ staticBlockId ]        }    });
    useEffect(() => {        if (data && data.cmsBlocks && data.cmsBlocks.items) {            setContent(data.cmsBlocks.items[0].content);        }
        if (!staticBlockId || error || data && data.cmsBlocks && data.cmsBlocks.items.length === ) {            setErrorMessage('Unable to get category page content. Please try again later.')        }
    }, [data, staticBlockId, error])
    return {        errorMessage,        isLoading: loading,        content    }}
The component returns three fields, and the most important for us is content, which contains the Category Landing page’s content!
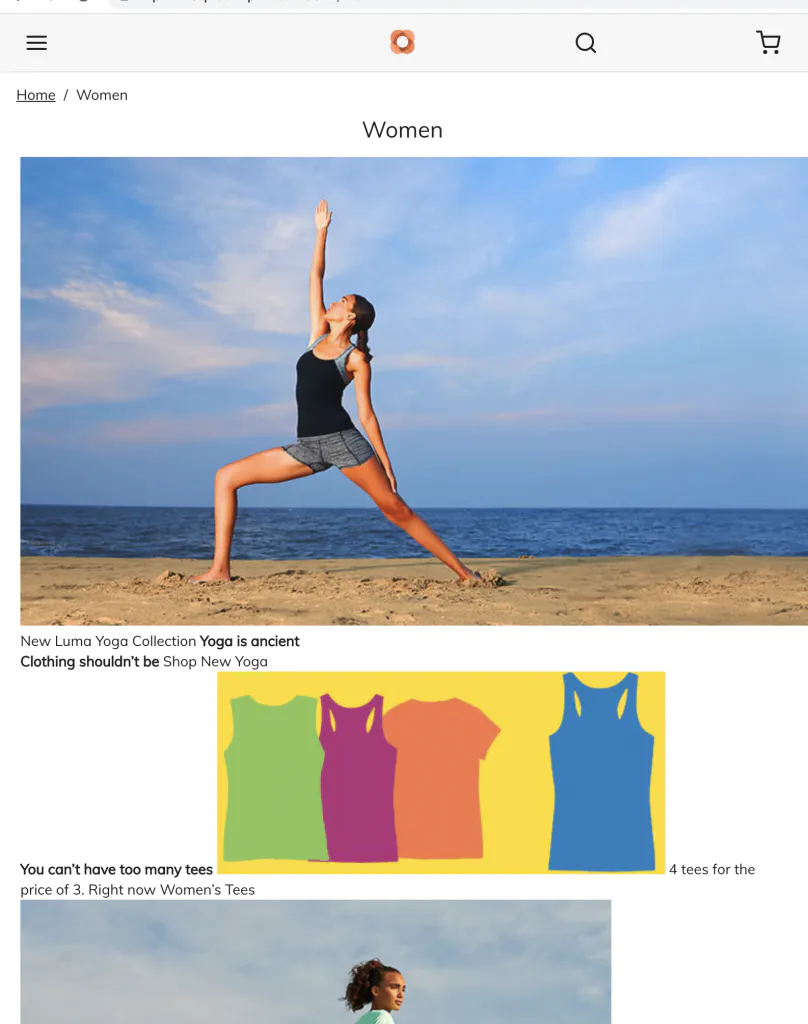
Take a look at the results of our fantastic work!
After the modifications, I can see the working category landing page in PWA Studio!

As you can see, the Page works but there are missing styles. A new content renderer is probably needed here, and I think this is quite a good subject for the next article.
Summary
This time we added support for Category Landing Pages to PWA Studio Storefront. As you can see, the PWA Studio Extensibility framework is really powerful, and thanks to this we can easily extend PWA Studio with new features.
You may also like:
Source code
The source code for this tutorial is available on my Github.
