
React itself is focused on building user interfaces, and it lacks a fully integrated routing solution. React Router is React's most popular routing library. Check how to get started with React Router React is a popular library for developing single-page applications (SPAs) that can be rendered on the client-side. In a SPA, the end-user who knows Multi Pages expects the following features: Routing is the procedure that keeps the browser URL in sync with the content. Using declarative routing, you can control the application’s traffic information using the expression “the route should look like this…” and place components wherever you have a preference. In reality, it is a third-party library known for its simplicity.
What is React Router?
React itself is focused on building user interfaces, and it lacks a fully integrated routing solution. React Router is React’s most popular routing library. It allows you to define paths in the same declarative style as most other libraries. A router allows your application to navigate by changing its browser’s URL or browsing history while staying in synch with other elements.
Understanding routes
The matching logic to a component is delegated to the path-to-regexp library. With this behavior, you set which component should be displayed for a specific URL path.
It means that if you have, for example, an “about me” page and the path of this page is “/about-me,” you need to assign a component that Reacts will render for that specific path.
What does React Router DOM do?
React Router DOM allows you to implement dynamic routing in web apps. React RouterDOM supports component-based routing according to the app’s requirements and the framework. In contrast, the traditional routing architecture provides routing services in a configuration outside of a currently active app. React Router is the best solution for creating React Applications that run in the browser. React router DOM is the quickest way to create routing in React.
Let’s dive in!
This tutorial is split out among multiple areas. Our first task is to a create React app and install React Router using npm. Now we’ll get down to some basic features of the React Router. Each concept and system for constructing these routes will be discussed along the course.
The full code for the project is published at this GitHub repository. This tutorial presents concepts of using React routing, the basics of React, hooks, and testing.
Prerequisites
I tested the code in Node 14.17.3. I set up the project using Create React App. You will also need a basic knowledge of JavaScript, HTML & CSS add React to understand what is going on here, but if you need to learn React Router, you are familiar with those things.
By The Way: HTML means HyperText Markup Language, so it’s not a sexually transmitted disease.
Scaffold the project
As I mentioned before, you’ll require the Node installed on your computer for this tutorial. Then you can follow these instructions to set up React project using Create React App.
Changes after this: step: Scaffold the project
Setting up React Router
Now you can install React Router by using npm or yarn. Let’s use npm
$ npm install react-router-dom@6Changes after this: step: Setting up React Router
Cleanin’ Out My Closet
Before we go deeper, let’s clean some code that CRA generated for us.
Replace index.js with this content:
import React from "react";import ReactDOM from "react-dom";import App from "./App";
ReactDOM.render(<App />, document.getElementById("root"));
Remove these files: reportWebVitals.js, index.css, logo.svg, App.css, and App.test.js -who needs tests??? But wait, we can add our own tests later, don’t worry, I am just trolling you.
Replace App.js with this content:
import React from "react";
export const App = () => {  return (    <>      <h1>Hello, hello, hello</h1>    </>  );};
export default App;
Change title and description in public/index.html and remove unnecessary comments. The final result should look like this:
<!doctype html><html lang="en">  <head>    <meta charset="utf-8" />    <link rel="icon" href="%PUBLIC_URL%/favicon.ico" />    <meta name="viewport" content="width=device-width, initial-scale=1" />    <meta name="theme-color" content="#000000" />    <meta name="description" content="React router tutorial" />    <link rel="apple-touch-icon" href="%PUBLIC_URL%/logo192.png" />
    <link rel="manifest" href="%PUBLIC_URL%/manifest.json" />    <title>React Router example</title>  </head>  <body>    <noscript>You need to enable JavaScript to run this app.</noscript>    <div id="root"></div>  </body></html>
Changes after this: step: Cleanin’ Out My Closet
It’s not time for styling

Yeah, so let’s use React Bootstrap, which provides some components and styles to focus on writing React code. It is a good move, isn’t it?
$ npm install react-bootstrap bootstrap@5.1.3Import bootstrap styles in the index.js. Just add this line after other imports:
import "bootstrap/dist/css/bootstrap.min.css";OK, that all was easy. Let do something less trivial than importing things from npm.
Changes after this: step: It’s not time for styling
Add Router component
To get React Router working in your App, you need to add a Router. Basically, it means that you need to wrap your app with a top-level router that makes all other React Router components and hooks work. A router is stateful, and it creates history with the initial location and subscribes to the URL.
React Router can subscribe to the URL changes thanks to the History object. Each user action that changes URL is kept in History Stack.
There are three types of those actions: PUSH, POP, and REPLACE.
-
PUSH - a new entry is added to the history stack
-
POP - it happens when a user click Browser’s back or forward buttons
-
REPLACE - Replace action is similar to PUSH, but it replaces the current entry in the history stack instead of adding a new one
A location is an object built on top of a window. location object. In this object, you can find information about URL, and in general, it represents where a user is at the time.
There are three types of Routers in react-router-dom:
-
BrowserRouter - recommended for running React Router in a Web browser
-
HashRouter - is used for apps where the URL should not be sent to a server for some reason. It’s not recommended to use the Hash router unless you absolutely have to.
-
MemoryRouter - the common case of using MemoryRouter is testing. It stores all information in an array.
OK, so let’s wrap our app by BrowserRouter.
index.js:
import React from "react";import ReactDOM from "react-dom";import { BrowserRouter } from "react-router-dom";import App from "./App";import "bootstrap/dist/css/bootstrap.min.css";
ReactDOM.render(  <BrowserRouter>    <App />  </BrowserRouter>,  document.getElementById("root"),);
Changes after this: step: Add Router component
Add Navigation and links
Update app component (App.js) file with this content:
import React from "react";import { NavLink } from "react-router-dom";import { Navbar, Container, Nav } from "react-bootstrap";
export const App = () => {  return (    <>      <Navbar bg="light" expand="lg">        <Container>          <Navbar.Brand>            <NavLink              to="/"              style={{ textDecoration: "none", color: "inherit" }}            >              Your account            </NavLink>          </Navbar.Brand>          <Navbar.Toggle aria-controls="basic-navbar-nav" />          <Navbar.Collapse id="basic-navbar-nav">            <Nav className="me-auto">              <NavLink to="/address" className="nav-link">                Address book              </NavLink>              <NavLink to="/orders" className="nav-link">                Orders              </NavLink>            </Nav>          </Navbar.Collapse>        </Container>      </Navbar>      <Container className="mt-3">        <h1>Hello, hello, hello</h1>      </Container>    </>  );};
export default App;
We imported a NavLink component here from react-router-dom:
import { NavLink } from "react-router-dom";A NavLink component is a special type of the Link component with an additional feature. It can have an “active” class where the URL is the same as “to property.
A Link React component renders tag with real href property. The difference about the real tag is that React Router will handle navigation to specific locations when you use Link (and NavLink).
So in our app, even we haven’t declared any routes yet, the URL is changed without page reloading thanks to React Router.
Besides, we imported there some Bootstrap stuff:
import { Navbar, Container, Nav } from "react-bootstrap";The page should look like this:

Summarizing, we added three links: HomePage: /, Address book: /address, and Orders: /orders.
Changes after this: step: Add navigation and links
Add the first route
React Router is a declarative routing framework that means you configure Routes to use standard React components.
At the end of this step, you now have a react application to find navigation links showing the components for each route.
Let’s implement the first route. To do so, we need just to import Route and Routes components in the app and use them in this way:
import { Routes, BrowserRouter, Route} from "react-router-dom";
(...)
<BrowserRouter>    <Routes>        <Route path="/" element={<App />} />    </Routes></BrowserRouter>
So we have a route that handles the ”/” path and renders the App, a React component. Basically, nothing has changed in our app so far. Let’s implement other routes.
Changes after this step: Add the first route
Add first nested routes and outlet
React Router uses nested routes to provide the most detailed routing details inside child components. Those routes group your routing information directly into components to render other components.
By the finish of this step, you will have various ways of providing info. This is a little additional code, but the routes keep the child’s parents in line. Not every project uses a nested route: some prefer an explicit list.
Nested routes allow you to build a complex system of routing. Each route defines a portion of the URL through segments, and a single URL can match multiple routes. Take a look:
Here is our main route:
/Here is the route for the address book:
/addressAnd here is the route for address details
/address/:addressIdSo the route is built by three routes: / + address/ + :/addressId
Let’s implement that scenario. Please, replace <Route path=”/” element={
<Route path="/" element={<App />}> <Route path="address" element={<AddressBook />}> <Route path=":addressId" element={<AddressDetails />} /> </Route></Route>Hero you go!
Of course, we need to define two new components: AddressBook, and AddressDetails
src/routes/AddressBook/addressBook.js:
import React from "react";
export const addressBook = () => {  return <p>Address book will be here</p>;};
export default addressBook;
src/routes/AddressBook/index.js
export { default } from "./addressBook";Do the same for address details (and do not forget about importing these routes in index.js!)
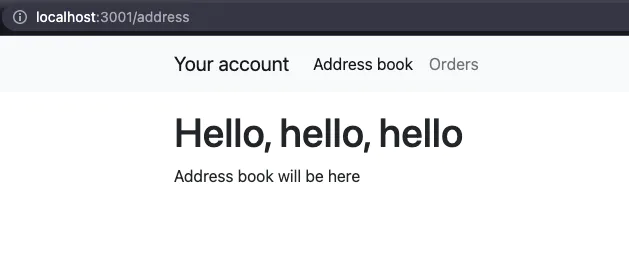
That should work, but wait. If you go now for the address page, you will see that the address route is rendered, but it looks pretty the same as the index route, but we except that there will be a paragraph: Address book will be here.

To render the content of any child, you need to use the Outlet component that renders the next match in a set of matches.
Please import the Outlet React component to the App component:
import { NavLink, Outlet } from "react-router-dom";and add it below the
<Container className="mt-3"> <h1>Hello, hello, hello</h1> <Outlet /></Container>Now the paragraph from the address book component is in place
Changes after this: step: Add first nested routes and Outlet
Add Index routes
Let’s go ahead and add some content to the address book. First, add some addresses:
const addresses = [ { id: 1, addressName: "Polna 1, Wrocław", }, { id: 2, addressName: "Wrocławska 2, Warszawa", },];Then, render navigation with addresses:
const navLinks = addresses.map((address) => {  return (    <ListGroupItem key={address.id}>      <NavLink to={`/address/${address.id}`} key={address.id}>        {address.addressName}      </NavLink>    </ListGroupItem>  );});
const shouldDisplayNav =  navLinks && navLinks.length ? (    <ListGroup>{navLinks}</ListGroup>  ) : (    <p>There are no addresses.</p>  );
Return all stuff with a nice layout:
return addresses ? ( <Row> <Col sm="3">{shouldDisplayNav}</Col> <Col sm="9"> <Outlet /> </Col> </Row>) : ( <Row> <p>There are no addresses.</p> </Row>);Do not forget about imports:
import { NavLink, Outlet } from "react-router-dom";import { ListGroupItem, ListGroup, Col, Row } from "react-bootstrap";The page should look like this:
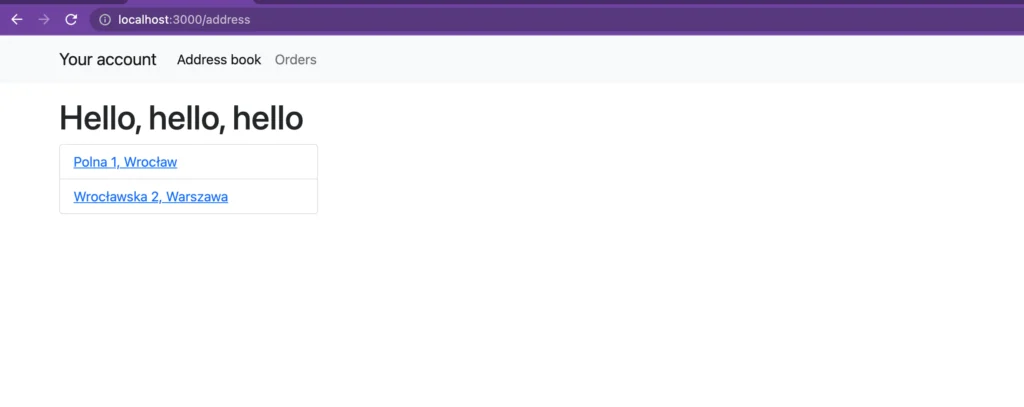
On the right of navigation, there is a space for address details, but initially then is empty space. When you click on an address in navigation, you can see address details.
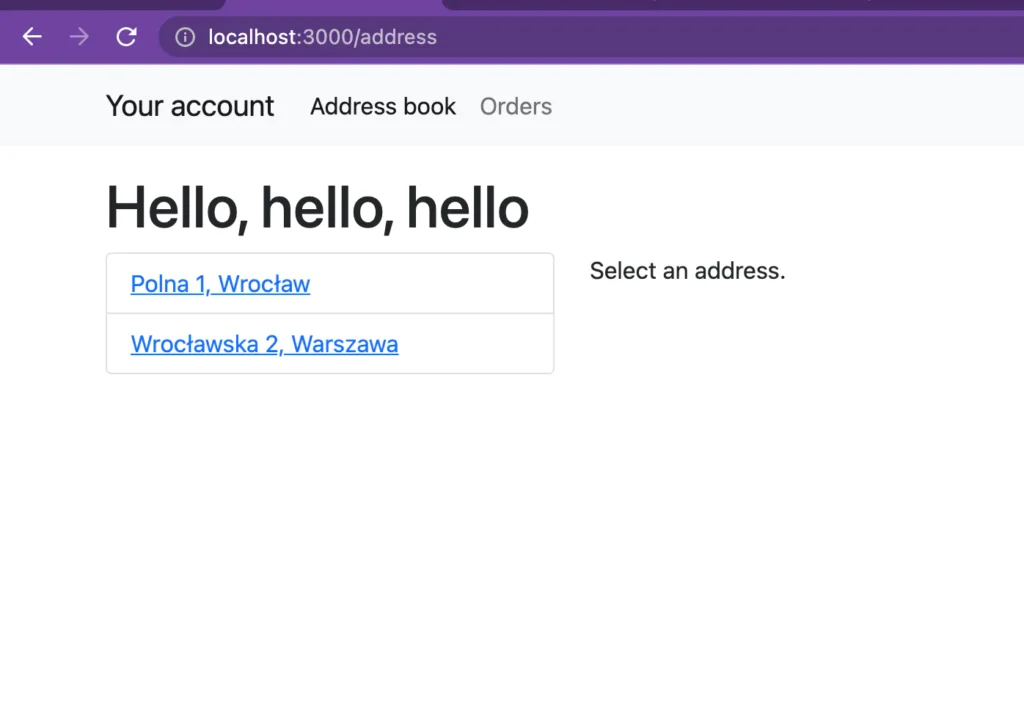
There is a way to add some improvements! Let’s add a paragraph that says: “Please select an address.” To do so that you can use another pretty cool feature of React Router called: Index route
Add this code to index.js to AddressBook route component:
<Route index element={<p>Select an address.</p>} />Now, when you go to the address book, you can see “Select an address” text by default:
Let’s do something similar for the home route:
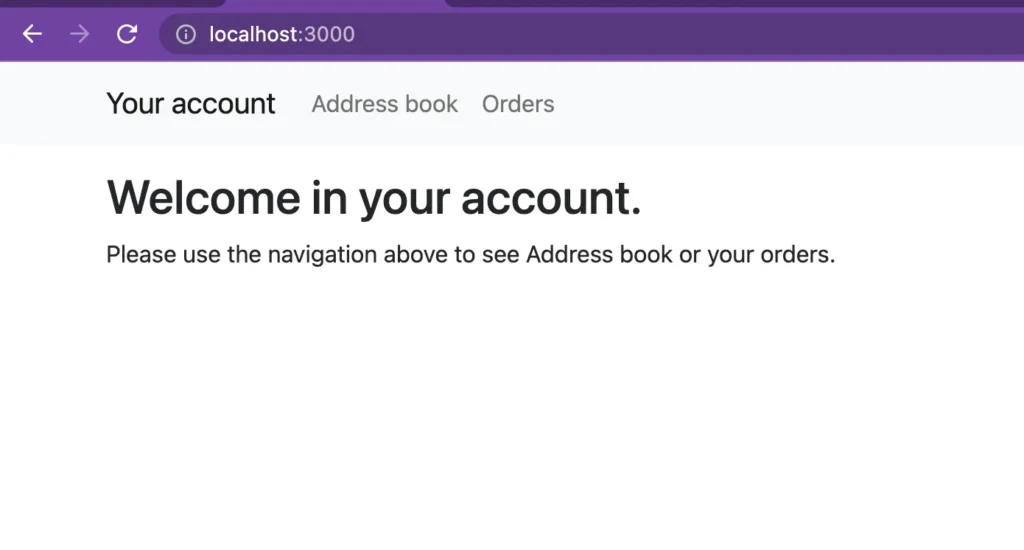
<Route index element={ <> <h2>Welcome in your account.</h2> <p>Please use the navigation above to see Address book or your orders.</p> </> }/>Remove this code from App.js
<h1>Hello, hello, hello</h1>The homepage looks like this now:
Changes after this: step: Add index routes
Use URL params
We have already defined a route for Address Details that receives addressId param:
<Route path=":addressId" element={<AddressDetails />} />When you click on addresses, the URL is changing:
http://localhost:3000/address/1http://localhost:3000/address/2“1” and “2” in this case are addresses ID. The question is: how do we handle those params in the AddressDetails React component?
useParams hook
React Router provides a useParams hook that allows you to handle URL params. Take a look:
import React from "react";import { useParams } from "react-router-dom";
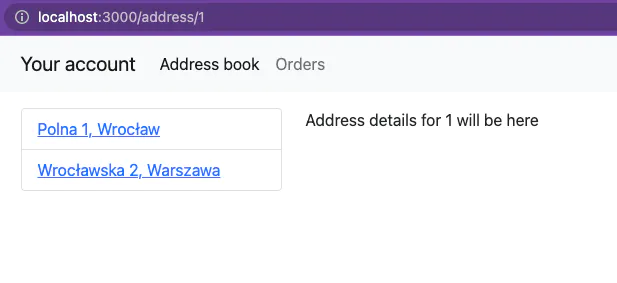
export const AddressDetails = () => {  const { addressId } = useParams();  return <p>Address details for {addressId} will be here</p>;};
export default AddressDetails;
Now, addressId is handled by the AddressDetails component:
Changes after this step: Use URL Params
Use search params
React Routes provides a useSearchParams hook that allows you to read and modify a query part of a URL (q=). Let’s use it to add some filtering to the App.
First import useSearchParams hook in the AddressBook React component ad get searchParams, and setSearchParams from it:
import { useSearchParams } from "react-router-dom";
// below in the compoonent body:
const [searchParams, setSearchParams] = useSearchParams();
Second, add a search form. To do so, add this code at the beginning of the return function:
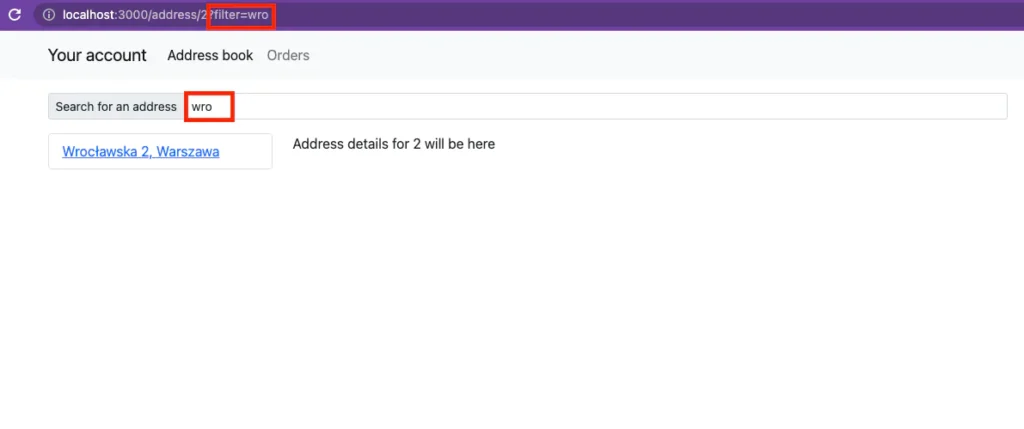
<Col sm="12"> <nav> <InputGroup size="sm" className="mb-3"> <InputGroup.Text id="address-search"> Search for an address </InputGroup.Text> <FormControl aria-label="Search for an address" aria-describedby="address-search" value={searchParams.get("filter") || ""} onChange={(event) => { const filter = event.target.value; if (filter) { setSearchParams({ filter }); } else { setSearchParams({}); } }} /> </InputGroup> </nav></Col>A function bound on the onCahnge event sets the current input value to the URL query param.
Third, let’s read the query param and filter addresses by it:
const navLinks = addresses  .filter((address) => {    const filter = searchParams.get("filter");    if (!filter) return true;
    let name = address.addressName.toLowerCase();
    return name.startsWith(filter.toLowerCase());  })  .map((address) => {    return (      <ListGroupItem key={address.id}>        <NavLink to={`/address/${address.id}`} key={address.id}>          {address.addressName}        </NavLink>      </ListGroupItem>    );  });
In the previous step, we named a param by word: filter, and now we can read that value by using this: searchParams.get(‘filter’);
Take a look at the filtering in action:
Changes after this step: Use search params
Handle no matching route
The last thing I want to show you is the no-match route. It’s a case when the user goes to a route that does not exist, for example,/blablabla
To handle that, add this route component definition at the end of your route components definitions:
<Route path="*" element={ <main> <p style={{ padding: "30px", textAlign: "center" }}> There's nothing here! </p> </main> }/>That code handles all routers not handled by other defined routes components. On the other hand, if no routes match, those elements will be rendered. Of course, you can use the react component as well.
Changes after this step: Handle no matching route
An additional thing: protected Routes
A protected route is used to ensure only logged-in users can use some places on your site. Typically we create e a secure route component for someone in the system to use /admin when they attempt to connect. However, some aspects of React Router must first be covered.
Basically, you can create a special React component that will check if a user can go to a protected route or not.
Working Demo
Here you can see the demo of the application we developed with react-router:
react-router-tutorial-omega.vercel.app
Source code
Here you can find the source code for this tutorial: https://github.com/Frodigo/react-router-tutorial
Here are the commits for each step:
Summary
React Router lets you handle all the routes in a React application. You can use it for a web app or even for React native app.
The router is one of the main React Router components, and for web apps, there is a BrowserRouter react component, a router implementation that uses HTML5 History API.
React Router provides other essential components are Routes, Route, Link, and NavLink.
Besides, there are a few hooks like useParams, useSearchParams, and useNavigate.
So react-router package provides just components and just hooks, and those all together allow you to create complex routing systems easily.
