Vue JS is a progressive framework for creating view layers of web apps. Check how to get started coding with Vue.

Unknown word: Vue - this is the sentence that one of my tools that check grammar stands out to me. It’s funny because, probably for most front-end developers, Vue is a known word. After all, we all love JavaScript frameworks.
I had been working with AngularJS a lot. Later I needed to learn KnockoutJS because Magento uses it. I wouldn’t say I liked it(really), so I started work with React, and a few months ago, I had the opportunity to work with Vue apps, so I have begun to learn Vue.
It was not too difficult for me, and in the end, I joined the Vue Storefront team. My tiny conclusion here is frameworks are only frameworks, and when you are experienced in one of them, you can quickly learn from others.
Of course, in terms of different frameworks, API is other, the approach is different, but at the end of the day, there are if-else statements, memory leaks, and issues to solve.
The framework does not matter. It makes building user interfaces easy, but JavaScvript knowledge is a clue here, so if you are good at JavaScript, just learn the API of a framework and solve problems. In this article, I show you how to get started with Vue from the perspective of a developer who has experience in other frameworks. In this article, you won’t find anything about how to print hello world in console, add 1+1, what component is, and so on. I hope you have already known the secret to how to console.log the Hello world. ;-)
Project setup using Vue CLI
In React, we have Create React App. Here you can find something similar and just as good: Vue CLI. It helps you install the Vue application. Using Vue CLI, you can manually select features you want, such as vuex, Vue router, prettier, support for TypeScript, and so on. Vue CLI will generate project files for you.
It’s fair to say that setting up a Vue app using Vue CLI is an easy task. Let’s try it.
First, make sure that you have Node and package manager installed. I use Node v14 and Yarn.
$ yarn global add @vue/cli @vue/cli-service-global$ vue --version // @vue/cli 4.5.15 for meNavigate to the directory where you want to create a new project and use the following command:
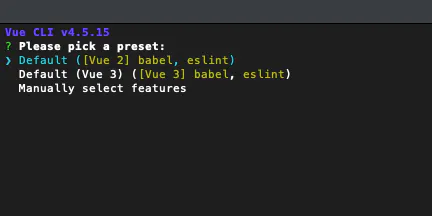
$ vue create another-cool-projectThen you can see something like this:

I used the Default (Vue 3) ([Vue 3] babel, eslint) option, and my project was installed successfully.
🎉  Successfully created project another-cool-project.👉  Get started with the following commands:
$ cd another-cool-project$ yarn serve
There is a Yarn serve command that runs the development server, so let’s use them, and in the meantime, I will show them the most important directories and files of the newly created project.
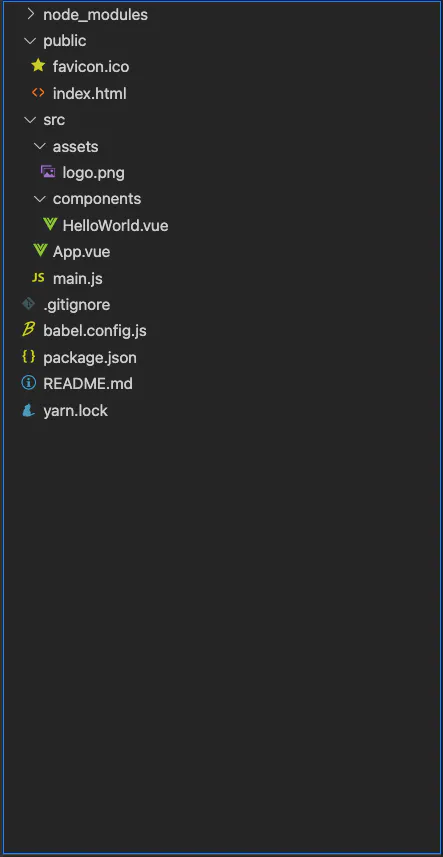
Vue project structure
Public directory
It contains public static files like index.html and favicon
src folder
You will spend a lot of time here because it’s a place where you can find source files like components, assets, CSS files, and so on.
main.js file
Main.js is an entry point of the Vue app, and there is a JavaScript code responsible for Vue app initialization.
components directory
If you want to create a Vue component, this is the place where you will do that.
App.vue file
It’s a primary component, let’s say the app’s root component. It’s used in main.js to create a new Vue app like this:
import { createApp } from "vue";import App from "./App.vue";
createApp(App).mount("#app");
All project files and directories should look like this in visual studio code:

Understanding Vue Files
When you see the .vue file the first time, it can be strange because there is a mix of JavaScript code, HTML, and CSS. Take a look:
<template>  <h1>This is the title</h1></template>
<script>export default {  name: 'Title',}</script>
<style>h1 {  color: violet}</style>
So there are three tags: template, script, and style. The first one is the component’s template, and it describes the structure of your HTML. Vue template syntax allows you to use HTML + special, let’s say, directives to bind data, methods and events with HTML.
In the script tag, you define components and write JavaScript code.
The style tag is for styling. For example, you can use global styles or local (scoped), CSS, or SCSS. Details later.
Data binding
I want to create a simple app that will show cards of football players (lastly, I started to play Fifa Ultimate team, so it inspires me).
Each player has name, team, country, position, and price information. For now, we can put plain HTML to App.js:
<template> <div class="player"> <h1>Robert Lewandowski</h1> <p><strong>FC Bayern, Poland</strong></p> <p>Position: Striker</p> <p>Price: 1000</p> </div></template>How makes that dynamic? Each component can have a data property, a function that returns an object, and then you can use that object in templates and JavaScript code of the component.
Add data prop to the component:
export default { name: "App", data() { return { name: "Robert Lewandowski", club: "FC Bayern", country: "Poland", position: "Striker", price: 1000, }; },};Now we can use this data in the template, and we need to bind each property to HTML. To do so we have to use {{ }} syntax for example {{ name }} will replace name with ‘Robert Lewandowski’ string.
Take a look:
<template> <div class="player"> <h1>{{ name }}</h1> <p><strong>{{ club }}, {{ country }}</strong></p> <p>Position: { position }</p> <p>Price: { price }</p> </div></template>Binding attributes or components property
Let’s add a new property to the player called: image:
image: './avatar.png'to bind this property to the src attribute of the image, you can use the v-bind directive so this code:
<img v-bind:src="image" v-bind:alt="name" />will be rendered in the browser like this:
<img src="./avatar.png" alt="Robert Lewandowski" />Tip: there is a shorthand for v-bind. Take a look:
<img :src="image" :alt="name" />Conditional rendering
I have an idea to add a particular label to the player that shows if the price of a player is low or high.
For example:
-
if the price is less than 5000, display ‘low.’
-
otherwise, display ‘height.’
Vue provides vue-if and vue-else directive that allows rendering markup conditionally:
<p> Price: {{ price }} <strong v-if="price < 2000">Low</strong> <strong v-else>High</strong></p>Remember that v-else works only when the HTML node is next to the previous, which has the v-if directive set up.
Computed properties
Let’s modify the feature with labeling and add logic to our App component:
Show the label only if player is on for sale
To do so, let’s add a new property to a player object called forSale:
forSale: false;and modify v-if in the template:
<p> Price: {{ price }} <strong v-if="price < 2000 && forSale">Low</strong> <strong v-if="price <= 2000 && forSale">High</strong></p>It works but is a little bit freaky. Putting logic to the temple is not a good idea, even in such a simple example. Don’t worry. Vue has a lovely mechanism for handling situations like that: computed properties responsible for managing complex logic.
Take a look at how to define computed property:
export default {  name: 'App',  data() {   // data here  },  computed: {    playerLabel: function () {      if (!this.forSale) {          return null;        }
return (this.price < 2000) ? 'Low' : 'High' } }}</script>Note: The ‘this’ keyword in the code refers to the Vue instance.
Now you can use it in the template like this:
<strong v-if="playerLabel">{{ playerLabel }}</strong>Important note: computed properties are cached based on their reactive dependencies. In our case, that means that the template will re-render computed property only if the forSale flag or price is changed.
If you come from React, you can compare computed properties to the useMemo hook.
Methods
When you create a web app, the common thing is to bind events to a javascript code or, let say, methods.
A methods option allows you to add methods to the Vue components. Let’s create a method that toggles the forSale flag.
export default { name: 'App', data() { // data here }, computed: { // computed properties }, methods: { toggleForSale() { this.forSale = !this.forSale; } }}</script>So we have the method declared and bind it to the DOM element? First, let’s create a button:
<button type="button"> <span v-if="forSale">Remove from transfer list</span> <span v-if="!forSale">Add to transfer list</span></button>To attach an event to the method, we need to use the v-on directive. In our case, we want to connect the method to the click event:
<button type="button" v-on:click="toggleForSale"></button>You can also use something like this:
<button type="button" @click="toggleForSale"></button>Note: I will show you more about events later.
Watchers
Sometimes you need to watch when the specific property is changed and run some code. Vue provided a watch option. Take a look:
export default { name: "App", data() {}, computed: {}, methods: {}, watch: { forSale(oldValue, newValue) { console.log(oldValue, newValue); // here you can a logic fired when forSale property is changed // for example an http request to external API can be fired here // axios.post(...) }, },};Iterating through data
Let’s imagine that we have more than one player, and we want to display all of them. First, of course, we need to modify our data object:
data() { return { players: [ { id: 1, name: 'Mo Salah', club: 'Liverpool FC', country: 'Egypt', position: 'Striker', price: 2000, image: './avatar.png', forSale: false }, { id: 2 name: 'Robert Lewandowski', club: 'FC Bayern', country: 'Poland', position: 'Striker', price: 3000, image: './avatar.png', forSale: true } ] }},Please notice that I added the id property to each player object. We will use it later.
To iterate through the array we need to use the v-for directive:
<template> <div class="player" v-for="player in players" :key="player.id"> <h1>{{ player.name }}</h1> <img :src="player.image" :alt="player.name" /> <p><strong>{{ player.club }}, {{ player.country }}</strong></p> <p>Position: {{ player.position }}</p> <p> Price: {{ player.price }} <strong v-if="player.playerLabel">{{ player.playerLabel }}</strong> </p> <button type="button" @click="toggleForSale()"> <span v-if="player.forSale">Remove from transfer list</span> <span v-if="!player.forSale">Add to transfer list</span> </button> </div></template>So using v-for, we repeat in the players’ array, and we get a player. Then we can access a player’s object properties using a player reference like a player.name, player. image etc.
Note: after this change, our price label and event listeners stopped working, and this is great because we have another problem to solve!
We will solve that by creating a player component, but… in the following article.
Summary
Vue is a great, progressive framework that can be a good choice even for a large application when you think about a view layer.
Today, I showed you some basics about creating web apps using Vue, but only a minor part. In the following articles, I would like to show you some more advanced features like:
-
Vue components
-
styling
-
events
-
state management
-
forms
-
communication with APIs
-
testing
-
and so on
Get in Touch!

